Personalized Introduction
There is something wonderfully special about red velvet desserts. They have that beautiful deep red color, a gentle cocoa flavor, and a creamy sweetness that makes them feel a little more elegant than an ordinary chocolate dessert. But when you turn those flavors into brownies, something magical happens.
These Red Velvet Brownies are rich, fudgy, soft in the center, and finished with a creamy swirl of cheesecake-inspired topping. They are the kind of dessert I love making when I want something that looks impressive without spending hours in the kitchen.
If you are a fan of red velvet cake, imagine taking all those familiar flavors and packing them into a dense, chewy brownie. You still get cocoa and vanilla, but instead of a tall slice of cake, you get a little square that is incredibly rich and satisfying.
I also love how pretty these brownies look on a dessert table. The deep red color makes them perfect for Valentine’s Day, Christmas, birthdays, bridal showers, or any time you want to make an ordinary afternoon feel a little more special.
Recipe Origin & Story
Red velvet is traditionally associated with a soft cake made with cocoa, vanilla, and a distinctive red color, often paired with cream cheese frosting. Over time, those flavors have found their way into cookies, cheesecakes, cupcakes, pancakes, and, of course, brownies.
Red Velvet Brownies are one of my favorite ways to enjoy the combination because brownies naturally provide the dense, fudgy texture that makes chocolate desserts so comforting.
The beauty of this recipe is that you do not need to make a separate cake and frosting. Instead, a simple brownie batter is prepared, colored red, and paired with a sweet cream cheese mixture. The result is a dessert that tastes familiar but has its own personality.
I think these brownies are especially wonderful for sharing. Put a plate on the table and suddenly everyone wants to know what you baked. The bright red color practically begs you to take a picture before the first brownie disappears.
Ingredient Spotlight
- Main Star: Cocoa powder provides the gentle chocolate flavor that gives red velvet its signature taste. You do not need an overwhelming amount because red velvet is meant to be more delicate than a classic chocolate brownie.
- Secret Boost: Cream cheese adds tanginess and richness. That slight tang helps balance the sweetness of the brownie and creates the classic red velvet-and-cream-cheese combination.
- Quality Tips: Use fresh eggs, good-quality cocoa powder, real vanilla extract, and full-fat cream cheese for the smoothest topping. Choose a food-safe red gel coloring for a strong color without adding too much liquid.
Butter is another important ingredient because it contributes both richness and moisture. Brown sugar can add extra chewiness and a subtle caramel-like flavor, while granulated sugar helps create the classic brownie texture.
If you are using cream cheese, let it soften at room temperature before mixing. Soft cream cheese blends much more smoothly and is less likely to leave little lumps in the topping.
Nutritional Benefits
These brownies are definitely an indulgent dessert, so I would not make health claims about them. They are designed to be enjoyed as a sweet treat.
That said, eggs provide protein and several nutrients, while cocoa contains naturally occurring plant compounds. Cream cheese contributes calcium and protein as well, although it also adds fat and calories.
If you want to balance your dessert plate, serve a small brownie with fresh strawberries, raspberries, or blueberries. The fruit adds freshness and a little natural sweetness that works beautifully with the rich brownie.
Adaptable Variations
- Dietary Swaps: Use a trusted gluten-free flour blend for gluten-free brownies. For a dairy-free version, use dairy-free butter and a plant-based cream cheese alternative that is suitable for baking.
- Flavor Twists: Add white chocolate chips, chopped pecans, mini chocolate chips, or a little espresso powder. White chocolate is particularly delicious with the mild cocoa flavor of red velvet.
- Seasonal Spins: Add heart-shaped decorations for Valentine’s Day, festive sprinkles for Christmas, or pastel decorations for spring celebrations.
For an extra creamy dessert, increase the cream cheese topping slightly and create more pronounced swirls across the surface.
You can also leave out the cream cheese layer completely and finish the brownies with a simple dusting of powdered sugar. The result is less rich but still delicious.
Cooking Science Explained
Why are brownies fudgy? Brownies become fudgy when they contain plenty of fat and relatively little flour. The moisture from the eggs and butter also helps create that dense texture.
Why should you avoid overmixing? Once flour enters the batter, mixing activates gluten. Too much gluten can make brownies tougher and more cake-like. Mix just until the flour disappears.
Why use gel food coloring? Gel coloring is concentrated, so you can achieve a vibrant red color without adding a large amount of liquid to the batter. Too much liquid can affect the texture.
Why soften cream cheese? Softened cream cheese blends smoothly with sugar and egg. Cold cream cheese tends to stay lumpy, which makes it harder to create an attractive swirl.
Easy, Step-by-Step Recipe
Ingredients
- 1/2 cup (113 g) unsalted butter, melted
- 1 cup (200 g) granulated sugar
- 1/4 cup (50 g) light brown sugar
- 2 large eggs
- 2 teaspoons vanilla extract
- 1 tablespoon red gel food coloring, or enough to achieve your preferred color
- 3/4 cup (95 g) all-purpose flour
- 1/4 cup (25 g) unsweetened cocoa powder
- 1/4 teaspoon salt
- 4 ounces (113 g) cream cheese, softened
- 1/4 cup (30 g) powdered sugar
- 1 large egg yolk
- 1/2 teaspoon vanilla extract
Instructions
- Preheat the oven: Heat your oven to 350°F (175°C). Line an 8-inch square baking pan with parchment paper, leaving enough overhang to lift the brownies out later.
- Melt the butter: Melt the butter gently and allow it to cool for a few minutes.
- Mix the brownie base: In a large bowl, whisk together the melted butter, granulated sugar, and brown sugar until smooth.
- Add the eggs and vanilla: Whisk in the eggs and vanilla until the mixture is glossy and well combined.
- Add the red color: Stir in the red gel food coloring until the batter has an even, deep red color.
- Combine the dry ingredients: In a separate bowl, whisk together the flour, cocoa powder, and salt.
- Combine wet and dry ingredients: Gradually fold the dry ingredients into the wet mixture. Stop mixing as soon as no obvious streaks of flour remain.
- Prepare the cream cheese mixture: Beat the softened cream cheese with powdered sugar, egg yolk, and vanilla until smooth and creamy.
- Layer the batter: Spread most of the red velvet brownie batter into the prepared pan. Spoon the cream cheese mixture over the surface, then add small spoonfuls of the remaining brownie batter.
- Create the swirl: Use the tip of a knife or a wooden skewer to gently swirl the cream cheese mixture through the red brownie batter. Do not over-swirl—you want distinct red and creamy ribbons.
- Bake: Bake for approximately 25–32 minutes, depending on your pan and oven. The edges should be set while the center remains slightly soft.
- Cool: Allow the brownies to cool completely in the pan. For especially clean slices, refrigerate them for 30–60 minutes after cooling.
- Slice and serve: Lift the brownies from the pan using the parchment paper. Cut into squares with a sharp knife and serve.
Practical & Valuable Tips
- Storage: Because of the cream cheese topping, store the brownies in an airtight container in the refrigerator. They are best enjoyed within several days.
- Serving Ideas: Serve chilled, at room temperature, or slightly cool with whipped cream, berries, vanilla ice cream, or a dusting of powdered sugar.
- Substitutions: If you do not have brown sugar, you can use additional granulated sugar, although the texture may be slightly different. Dutch-process or natural cocoa can be used depending on your preference.
My biggest tip is to avoid overbaking. Brownies continue cooking from residual heat after you remove them from the oven. If you wait until the center looks completely firm, you may end up with a cakier brownie than you wanted.
For clean cuts, allow the brownies to cool completely. I often refrigerate them briefly before slicing because the cream cheese layer becomes firmer and easier to cut.
Use a sharp knife and wipe it clean after each cut. It takes an extra minute, but it gives you those beautiful bakery-style squares.
When swirling the cream cheese layer, remember that less is more. A few gentle swirls create a much prettier pattern than repeatedly dragging the knife through the batter.
Make-Ahead & Batch-Cooking
Red Velvet Brownies are excellent for making ahead because they actually become easier to slice after cooling. You can bake them the day before serving and keep them refrigerated overnight.
If you are preparing them for a party, bake them the evening before. Once completely cool, cover the pan and refrigerate it. The following day, simply lift out the brownies, cut them into squares, and arrange them on a serving platter.
You can also make a double batch if you are serving a crowd. Use separate pans rather than making one extremely deep batch. A deeper brownie can take longer to bake and may cook unevenly.
For longer storage, cooled brownies can be frozen in an airtight freezer-safe container. Separate individual pieces with parchment paper so you can remove only the amount you need.
Eco-Friendly Kitchen Hacks
- Use reusable silicone baking mats or reusable parchment alternatives when possible.
- Save leftover brownie edges and turn them into ice cream toppings or dessert crumbs.
- Freeze extra brownies rather than letting them sit uneaten.
- Use reusable containers for refrigerator and freezer storage.
- Measure ingredients carefully so you do not waste excess batter or toppings.
- Use leftover cream cheese topping in small dessert parfaits or as a spread for fruit.
Pairing Suggestions
- Beverages: Coffee, cappuccino, black tea, chai, hot chocolate, cold milk, or a vanilla latte all pair beautifully with red velvet brownies.
- Sides & Sauces: Fresh berries, whipped cream, vanilla ice cream, chocolate sauce, raspberry sauce, or a light dusting of powdered sugar make lovely additions.
For Valentine’s Day, I love serving these brownies with fresh strawberries. The bright red fruit looks beautiful beside the deep red brownie and creamy white topping.
For a holiday dessert table, cut the brownies into smaller bite-size squares and arrange them alongside cookies, truffles, and other festive treats. Their color does most of the decorating for you.
Frequently Asked Questions
- Can I make Red Velvet Brownies without food coloring?
Yes. The food coloring is mainly responsible for the classic red appearance. Without it, the brownies will have a chocolate-brown color but will still taste delicious. - Why are my brownies not bright red?
The amount and type of food coloring, as well as the cocoa powder you use, can affect the final color. Gel food coloring generally provides a stronger color without adding much liquid. - Can I make these brownies without cream cheese?
Absolutely. You can skip the cream cheese swirl and bake the red velvet brownie base on its own. A powdered sugar dusting or simple vanilla glaze makes a nice finish. - How do I keep the brownies fudgy?
Use the recommended amount of flour, avoid overmixing, and do not overbake. The center should look set but still slightly soft when the brownies come out of the oven.
Call to Action
If you love red velvet cake and fudgy brownies, this recipe gives you the best of both worlds. You get rich chocolate flavor, a gorgeous red color, and a creamy cheesecake-style swirl in every bite.
Make a batch for Valentine’s Day, Christmas, birthdays, dinner parties, or your next weekend baking project. They are simple enough for a beginner but pretty enough to make you look like you spent much more time in the kitchen.
And once you make the basic recipe, have fun with it. Add white chocolate chips, nuts, chocolate drizzle, sprinkles, or fresh berries. You can easily turn these brownies into your own signature dessert.
If you make them, share them with someone who loves red velvet—or keep a few hidden for yourself. I certainly would not judge!
Bonus: Your Kitchen Notes
This is a recipe where little details can make a big difference, so I recommend keeping a few notes after your first batch.
Your kitchen note: Write down the exact amount of red food coloring you used and whether you preferred the brownies more fudgy or slightly cakey. If you make them again, you can adjust the recipe to match your favorite texture and color.
If you want a more intense chocolate flavor, add a small amount of espresso powder to the brownie batter. You probably will not taste obvious coffee, but it can make the chocolate taste deeper.
White chocolate chips are another wonderful addition. Their creamy sweetness contrasts beautifully with the cocoa and tangy cream cheese layer.
For a romantic dessert, use a heart-shaped cookie cutter to cut the cooled brownies into hearts. You will have a few scraps left over, but those scraps are perfect for snacking or layering into a quick dessert cup with whipped cream.
You can also turn the brownies into an elegant plated dessert. Place one brownie on a plate, add a scoop of vanilla ice cream, scatter a few raspberries around it, and finish with a small drizzle of chocolate sauce.
Most importantly, do not rush the cooling stage. I know that beautiful red brownie sitting in the pan is tempting, but letting it cool gives the texture time to set and makes slicing much easier.
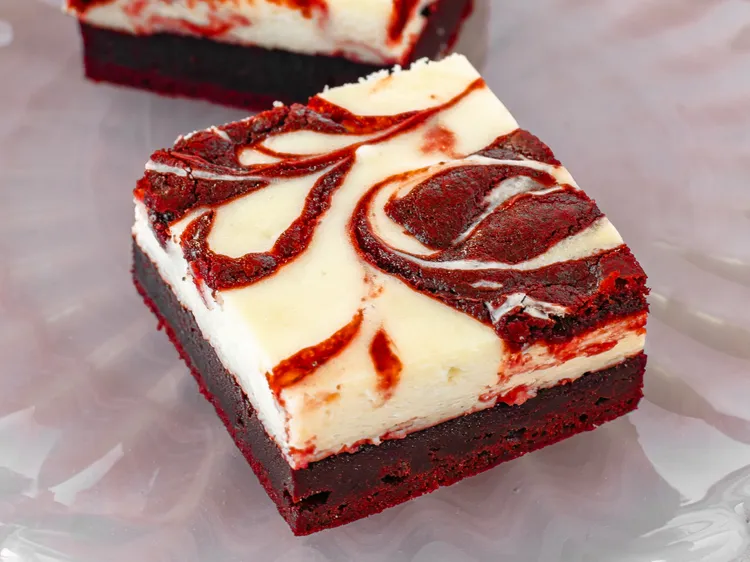
When you finally cut into them, you should see those gorgeous red and creamy swirls. The brownie should be rich and soft, while the cream cheese layer adds a gentle tang that keeps each bite interesting.
That is exactly why I love Red Velvet Brownies. They take a classic flavor combination and turn it into something incredibly approachable. You get the comfort of a brownie, the elegance of red velvet, and the creamy tang of cheesecake—all in one little square.