Personalized Introduction
Do you remember opening a little package of Cosmic Brownies and immediately knowing you were in for something chocolatey, fudgy, and wonderfully nostalgic? I certainly do. There was something about that shiny chocolate topping and those tiny colorful candy pieces that made these brownies feel like a special treat.
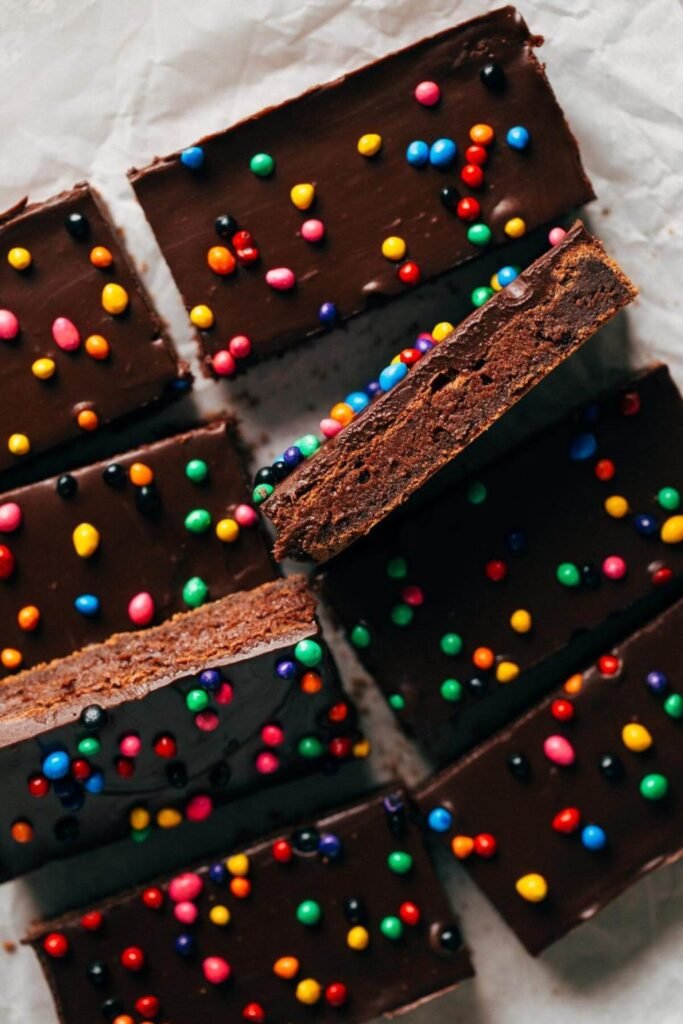
Today, I want to bring that feeling into your kitchen with Homemade Cosmic Brownies. The homemade version is rich, fudgy, and deeply chocolatey, with a smooth chocolate ganache-like topping and colorful candy-coated chocolate pieces sprinkled over the top.
What I love most is that you get all the fun of the classic treat while being able to control the ingredients and make the brownies exactly how you like them. You can make the brownies extra fudgy, use dark chocolate for a richer flavor, or add plenty of colorful sprinkles for that unmistakable cosmic look.
These brownies are perfect for lunchboxes, birthday parties, after-school snacks, bake sales, or those afternoons when you simply want a nostalgic chocolate dessert. And honestly, you do not need a special occasion. Sometimes a homemade brownie is reason enough.
Recipe Origin & Story
Cosmic Brownies are inspired by the familiar packaged chocolate snack that became a favorite for generations. The classic version is known for its dense chocolate brownie base, smooth fudge topping, and colorful candy pieces.
Making them at home gives you a chance to recreate that nostalgic combination with a fresh-from-the-oven brownie base. Instead of opening a package, you get the wonderful experience of mixing cocoa, butter, sugar, eggs, and flour in your own kitchen and filling the house with the smell of chocolate.
I think homemade versions of nostalgic desserts are especially fun because they let you recreate a childhood favorite while making it feel even more special. You can cut the brownies into traditional rectangles or make smaller squares for a party.
And if you have kids around, let them decorate the tops. Sprinkling the colorful candy pieces is probably the most exciting part of the entire recipe.
Ingredient Spotlight
- Main Star: Unsweetened cocoa powder gives the brownie base its rich chocolate flavor. For an even deeper chocolate taste, you can use a good-quality Dutch-process cocoa powder.
- Secret Boost: A combination of melted chocolate and cocoa powder creates a deeper, more intense chocolate flavor than cocoa alone. A little vanilla and salt also help balance the sweetness.
- Quality Tips: Use fresh eggs, good-quality cocoa powder, and real butter. When possible, use chocolate with a flavor you genuinely enjoy because the chocolate topping will be noticeable.
The chocolate topping is just as important as the brownie itself. A smooth mixture of chocolate and cream creates the soft, glossy layer that makes these brownies look so much like the nostalgic original.
And, of course, do not forget the colorful candy pieces. They are more than decoration—they provide a tiny crunchy contrast against the smooth chocolate topping.
Nutritional Benefits
These brownies are definitely a dessert, so I like to think of them as a treat to enjoy rather than something to make specifically for its nutritional benefits.
Cocoa does contain naturally occurring plant compounds and minerals, while eggs provide protein and several nutrients. However, the recipe also contains sugar, butter, and chocolate, so portion size is important if you are trying to keep your overall dessert intake moderate.
If you want to create a more balanced snack plate, serve a small brownie with fresh strawberries, raspberries, or banana slices. The fruit adds freshness and works beautifully with chocolate.
Adaptable Variations
- Dietary Swaps: Use a reliable gluten-free flour blend for gluten-free brownies. Dairy-free butter and dairy-free chocolate can be used for a dairy-free version.
- Flavor Twists: Add espresso powder, chopped toasted nuts, peanut butter chips, mint extract, or a little orange zest for a different chocolate experience.
- Seasonal Spins: Use orange and yellow candy pieces for autumn, pastel candy pieces for spring, or red and green candy pieces during the holidays.
If you love peanut butter and chocolate, spread a very thin layer of creamy peanut butter over the cooled brownies before adding the chocolate topping. You can also sprinkle chopped peanuts over the finished brownies.
For a serious chocolate lover’s version, use dark chocolate in the topping and add mini chocolate chips to the brownie batter.
Cooking Science Explained
Why do these brownies stay fudgy? Fudgy brownies generally contain a higher proportion of fat and chocolate compared with flour. Avoiding excessive flour and overbaking helps keep the center dense and moist.
Why should you avoid overmixing? Once flour is added, mixing develops gluten. Too much gluten can create a cakier or tougher brownie, while gentle mixing helps maintain that dense, fudgy texture.
Why cool the brownies before adding the topping? If the brownies are too hot, the chocolate topping can melt and slide around. Cooling gives you a firm surface for the glossy chocolate layer.
Why chill the finished brownies? Refrigerating the brownies helps the topping set and makes the brownies easier to slice into clean rectangles.
Easy, Step-by-Step Recipe
Ingredients
- 1/2 cup (113 g) unsalted butter, melted
- 1 cup (200 g) granulated sugar
- 2 large eggs
- 2 teaspoons vanilla extract
- 3/4 cup (75 g) unsweetened cocoa powder
- 3/4 cup (95 g) all-purpose flour
- 1/4 teaspoon salt
- 1/2 cup (85 g) semi-sweet chocolate chips
- 1/4 cup (60 ml) heavy cream
- 1 tablespoon unsalted butter
- 1/2 cup colorful candy-coated chocolate pieces
Instructions
- Preheat the oven: Heat your oven to 350°F (175°C). Line an 8-inch or 9-inch square baking pan with parchment paper, leaving a little overhang for easy removal.
- Melt the butter: Melt the butter gently and allow it to cool slightly.
- Mix the wet ingredients: In a large bowl, whisk together the melted butter and sugar. Add the eggs and vanilla and whisk until smooth and glossy.
- Add the cocoa: Whisk in the cocoa powder until evenly incorporated.
- Add the flour: Add the flour and salt. Fold gently until no obvious streaks of dry flour remain. Do not overmix.
- Fill the pan: Spread the brownie batter evenly into the prepared pan. Smooth the top with a spatula.
- Bake: Bake for approximately 20–25 minutes, or until the edges are set and a toothpick inserted into the center comes out with a few moist crumbs. Avoid overbaking if you want a fudgy texture.
- Cool completely: Allow the brownies to cool in the pan. For the cleanest topping and slices, chill them briefly once they have reached room temperature.
- Make the chocolate topping: Place the chocolate chips, heavy cream, and tablespoon of butter in a heatproof bowl. Melt gently in short intervals in the microwave, stirring between each interval, or use a double boiler. Stir until completely smooth.
- Spread the topping: Pour the chocolate mixture over the cooled brownies and spread it evenly with a spatula.
- Add the cosmic topping: Immediately sprinkle the colorful candy-coated chocolate pieces over the chocolate layer before it sets.
- Chill: Refrigerate the brownies for about 30–60 minutes, or until the chocolate topping is firm enough to slice.
- Cut and serve: Lift the brownies from the pan using the parchment paper. Cut into neat rectangles or squares and serve.
Practical & Valuable Tips
- Storage: Keep the brownies in an airtight container. They can be stored at room temperature for a short period or refrigerated for a firmer topping and longer freshness.
- Serving Ideas: Serve with cold milk, coffee, vanilla ice cream, strawberries, or raspberries.
- Substitutions: Use dark chocolate instead of semi-sweet chocolate, regular cocoa instead of Dutch-process cocoa, or different candy pieces depending on the occasion.
Do not overbake these brownies. This is probably the most important tip I can give you. If you want that dense, fudgy texture, take them out when the center is just set and a toothpick shows a few moist crumbs.
Also, wait until the brownies have cooled before spreading on the chocolate topping. If you spread the topping over hot brownies, it can become thin and uneven.
For perfectly straight cuts, chill the finished brownies first. Use a sharp knife and wipe the blade clean between cuts. It makes a surprisingly big difference in presentation.
If you want the candy pieces to stay bright and colorful, sprinkle them over the topping while it is still soft. Once the chocolate sets, the candies will not stick properly.
Make-Ahead & Batch-Cooking
Homemade Cosmic Brownies are an excellent make-ahead dessert. You can bake them the day before you plan to serve them, add the topping, chill them, and keep them covered until you are ready to cut and serve.
For parties, I recommend making the brownies the night before. This gives the topping plenty of time to set and makes slicing much easier the next day.
You can also prepare a double batch if you are baking for a school event, birthday party, or large gathering. Use two pans rather than trying to make one extremely thick batch, because the brownies may bake unevenly if the pan is too crowded.
Once cooled and cut, individual brownies can be wrapped or stored in an airtight container. You can also freeze them for longer storage. Thaw them in the refrigerator or at room temperature before serving.
Eco-Friendly Kitchen Hacks
- Use reusable silicone baking mats or reusable pan liners when possible.
- Save leftover chocolate pieces for cookies, pancakes, or hot chocolate.
- Turn imperfect brownie edges into ice cream toppings instead of discarding them.
- Freeze extra brownies so they do not go to waste.
- Use reusable airtight containers for storage rather than disposable wrapping.
- Buy candy pieces in quantities you can use rather than purchasing more than necessary.
Pairing Suggestions
- Beverages: Cold milk is the classic choice, but coffee, iced coffee, hot chocolate, vanilla milk, and black tea are also wonderful.
- Sides & Sauces: Vanilla ice cream, whipped cream, strawberries, raspberries, peanut butter sauce, or a drizzle of caramel make delicious additions.
For a birthday party, I love cutting the brownies into small rectangles and arranging them on a platter with colorful candies scattered around them. It makes the whole dessert table feel playful.
For a cozy night at home, warm a brownie very briefly and serve it with vanilla ice cream. The contrast between the dense chocolate brownie and cold creamy ice cream is hard to beat.
Frequently Asked Questions
- How do I make Cosmic Brownies extra fudgy?
Do not overmix the batter and avoid overbaking. Take the brownies out when the edges are set and the center still has a few moist crumbs on a toothpick. - Can I use dark chocolate for the topping?
Yes. Dark chocolate gives the topping a richer, less sweet flavor and works especially well if you prefer intense chocolate desserts. - Why is my chocolate topping too runny?
It may be too warm or contain too much cream. Allow it to cool slightly before spreading, then refrigerate the brownies so the topping can set. - Can I freeze Homemade Cosmic Brownies?
Yes. Cool and cut them first, then store them in an airtight freezer-safe container. Place parchment between layers if stacking them. Thaw before serving.
Call to Action
If you are craving a nostalgic chocolate treat, I hope you give these Homemade Cosmic Brownies a try. They are rich, fudgy, colorful, and incredibly fun to make.
You get that familiar combination of dense chocolate brownie, smooth chocolate topping, and cheerful candy pieces, but with the satisfaction of knowing you made the whole thing in your own kitchen.
Make them for birthdays, lunchboxes, bake sales, family movie nights, or simply because you want a really good brownie. And once you make the classic version, have fun with it. Add peanut butter, nuts, extra chocolate, different candy colors, or your favorite toppings.
If you love the recipe, save it, share it with your fellow chocolate lovers, and let me know what toppings you used to create your own cosmic masterpiece!
Bonus: Your Kitchen Notes
This is a recipe where I encourage you to keep your own little kitchen notes. Maybe you prefer your brownies extremely fudgy, slightly cakier, extra dark chocolatey, or loaded with colorful candy. Write down what worked best for you.
Your kitchen note: For the fudgiest brownies, watch the baking time closely. Ovens vary, and even a few extra minutes can change the texture. Start checking toward the early end of the suggested baking time.
If you want an even more nostalgic look, cut the brownies into long, narrow rectangles instead of squares. Spread the chocolate topping right to the edges and cover the surface with colorful candy pieces.
For holidays, change the candy colors. Red and green make a fun Christmas version, pastel candies work beautifully for Easter, and orange, yellow, and brown candies can create a playful autumn theme.
You can also make mini Cosmic Brownies for parties. Bake the brownies in a larger rectangular pan so the finished layer is thinner, then cut small rectangles once the topping has set.
And do not throw away the brownie scraps left around the edges. Crumble them over ice cream, layer them into a trifle with whipped cream, or simply enjoy them while nobody is looking. Those little scraps are one of the best perks of homemade brownies.
When everything is finished, take a moment to admire that glossy chocolate topping covered in colorful candy pieces. Then cut yourself a piece, pour a cold glass of milk, and enjoy.
Homemade Cosmic Brownies are more than just a chocolate dessert. They are a little trip down memory lane, made even better because you can share the experience with the people you love. Once you make them at home, you may find yourself reaching for this recipe whenever you want something nostalgic, chocolatey, and wonderfully fun.