Personalized Introduction
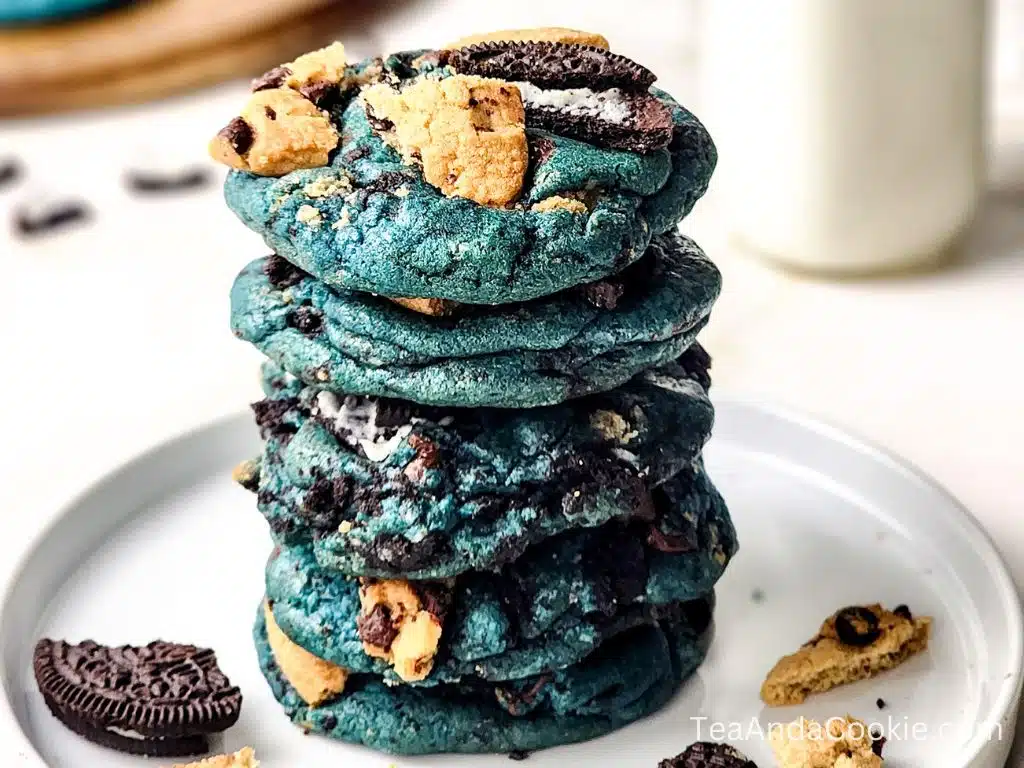
If you’re anything like me, there’s something magical about a giant, bakery-style cookie that’s crispy around the edges, soft and gooey in the center, and absolutely overflowing with chocolate. That’s exactly why I can’t get enough of these Cookie Monster Cookies. They’re colorful, fun, ridiculously thick, and packed with chocolate chips, crushed cookies, and plenty of sweet surprises in every bite.
The first time I baked these cookies, I was looking for something playful that would impress both kids and adults. I added chocolate chip cookies, sandwich cookies, colorful chocolate candies, and a hint of vanilla into a rich cookie dough, and the result was unforgettable. They disappeared from the cooling rack almost immediately!
One of my favorite things about this recipe is that every cookie looks unique. Some are bursting with melted chocolate, while others have crunchy cookie pieces peeking out from the top. They’re perfect for birthdays, bake sales, movie nights, or simply satisfying a serious cookie craving.
Today I’m sharing every tip I’ve learned so you can bake bakery-style Cookie Monster Cookies that are thick, chewy, and packed with delicious mix-ins every single time.
Recipe Origin & Story
Cookie Monster Cookies are inspired by everyone’s favorite blue cookie-loving character, making them a fun twist on classic chocolate chip cookies. Over the years, home bakers began creating oversized cookies loaded with crushed sandwich cookies, chocolate candies, chocolate chips, and sometimes even blue food coloring to resemble the famous character.
These cookies quickly became popular on social media because they’re colorful, over-the-top, and incredibly delicious. Unlike traditional cookies, Cookie Monster Cookies celebrate abundance—more chocolate, more cookies, and more fun.
Whenever I make these cookies, the kitchen fills with the irresistible aroma of butter, vanilla, and warm chocolate. It’s one of those recipes that instantly makes everyone gather around the oven waiting for the first batch.
They’re not just cookies—they’re a celebration of everything we love about homemade baking.
Ingredient Spotlight
- Main Star: Semi-sweet chocolate chips provide rich, melty pockets of chocolate throughout every cookie.
- Secret Boost: A little cornstarch in the dough creates an extra soft, thick, and chewy texture that stays fresh for days.
- Quality Tips: Use real butter, pure vanilla extract, high-quality chocolate chips, and fresh eggs for the best bakery-style results.
Nutritional Benefits
While these cookies are definitely a special treat, making them at home allows you to control the quality of the ingredients and avoid unnecessary preservatives found in many packaged desserts.
Eggs provide protein, while butter contributes richness and helps create the cookies’ tender texture. Using high-quality chocolate also adds small amounts of antioxidants.
The biggest benefit? Sharing homemade cookies creates wonderful memories with family and friends.
Adaptable Variations
- Dietary Swaps: Use gluten-free flour and gluten-free sandwich cookies, or substitute plant-based butter and dairy-free chocolate chips for a dairy-free version.
- Flavor Twists: Add white chocolate chips, peanut butter chips, chopped pecans, walnuts, toffee bits, or mini marshmallows.
- Seasonal Spins: Decorate with holiday-colored candies, pastel chocolates for spring, or festive sprinkles for birthdays and celebrations.
Cooking Science Explained
Chilling the cookie dough before baking helps prevent spreading, resulting in thick bakery-style cookies with soft centers.
Cornstarch tenderizes the dough by limiting gluten development, giving every bite an incredibly soft texture.
Slightly underbaking the cookies allows them to continue cooking on the baking sheet, creating perfectly gooey centers without becoming dry.
Easy, Step-by-Step Recipe
Ingredients
- 1 cup (226g) unsalted butter, softened
- 1 cup (200g) light brown sugar
- ½ cup (100g) granulated sugar
- 2 large eggs
- 2 teaspoons pure vanilla extract
- Blue gel food coloring (optional, for the Cookie Monster look)
- 3 cups (360g) all-purpose flour
- 2 teaspoons cornstarch
- 1 teaspoon baking soda
- ½ teaspoon baking powder
- ½ teaspoon salt
- 1½ cups semi-sweet chocolate chips
- 1 cup white chocolate chips
- 1 cup crushed chocolate sandwich cookies
- 1 cup chopped chocolate chip cookies
- ½ cup colorful chocolate candies
Instructions
- Preheat your oven to 350°F (175°C) and line baking sheets with parchment paper.
- Cream the softened butter, brown sugar, and granulated sugar until light and fluffy.
- Beat in the eggs one at a time.
- Mix in the vanilla extract and blue food coloring if using.
- In another bowl, whisk together the flour, cornstarch, baking soda, baking powder, and salt.
- Gradually mix the dry ingredients into the wet ingredients until a soft dough forms.
- Fold in the chocolate chips, white chocolate chips, crushed sandwich cookies, chopped chocolate chip cookies, and chocolate candies.
- Cover the dough and chill for at least 30 minutes.
- Scoop large portions of dough onto the prepared baking sheet, leaving space between each cookie.
- Press a few extra chocolate chips and cookie pieces onto the tops for a bakery-style appearance.
- Bake for 11–14 minutes until the edges are lightly golden while the centers remain soft.
- Allow the cookies to cool on the baking sheet for 10 minutes before transferring them to a wire rack.
- Enjoy warm with a glass of cold milk.
Practical & Valuable Tips
- Storage: Store the cookies in an airtight container at room temperature for up to 5 days.
- Serving Ideas: Enjoy with milk, hot chocolate, coffee, or vanilla ice cream.
- Substitutions: Replace chocolate candies with peanut butter candies, caramel pieces, or chopped candy bars.
- Extra Gooey: Slightly underbake the cookies for irresistibly soft centers.
- Bakery Finish: Add extra chocolate chips and cookie chunks immediately after baking while the cookies are still warm.
- Freezer Friendly: Freeze portions of cookie dough for fresh cookies anytime.
Make-Ahead & Batch-Cooking
These cookies are perfect for preparing ahead. The dough can be refrigerated for up to 48 hours before baking, allowing the flavors to develop even more while producing thicker cookies.
You can also freeze individual cookie dough balls for up to three months. Bake directly from frozen by simply adding one or two extra minutes to the baking time.
Baked cookies also freeze beautifully, making them perfect for holiday baking or preparing desserts in advance.
Eco-Friendly Kitchen Hacks
- Store leftover cookies in reusable containers.
- Freeze extra dough instead of wasting ingredients.
- Reuse parchment paper when possible for multiple baking batches.
- Use broken cookies as toppings for ice cream or milkshakes.
- Bake multiple trays at once to reduce energy consumption.
Pairing Suggestions
- Beverages: Cold milk, chocolate milk, hot cocoa, iced coffee, vanilla milkshake, or caramel latte make wonderful companions.
- Sides & Sauces: Vanilla ice cream, whipped cream, chocolate sauce, caramel drizzle, fresh strawberries, or cookie butter spread take these cookies to the next level.
Frequently Asked Questions
- Why did my cookies spread too much?
The butter may have been too warm, or the dough wasn’t chilled long enough before baking.
- Can I freeze the cookie dough?
Yes! Freeze individual dough balls for up to three months and bake straight from frozen.
- Do I have to use blue food coloring?
Not at all! The cookies taste amazing with or without the signature blue color.
- How do I keep the cookies soft?
Store them in an airtight container with a slice of bread to help maintain their soft texture.
Call to Action
If you’re looking for the ultimate bakery-style cookie that’s thick, gooey, colorful, and loaded with chocolate, these Cookie Monster Cookies deserve a spot in your baking collection. They’re fun to make, even more fun to eat, and guaranteed to impress anyone lucky enough to grab one.
If you bake this recipe, I’d love to hear how you customized it! Leave a comment below with your favorite mix-ins or decorating ideas. Don’t forget to save this recipe and share it with fellow cookie lovers who can’t resist an extra-thick homemade treat.
Bonus: Your Kitchen Notes
One of my favorite things about Cookie Monster Cookies is that no two batches are ever exactly the same. Sometimes I add extra white chocolate chips, sometimes I mix in mini marshmallows, and other times I top each cookie with an extra sandwich cookie piece before baking. Every version turns out wonderfully thick, chewy, and packed with flavor.
Use this section in your WordPress editor to record your favorite mix-ins, baking times, or decorating ideas. Over time, you’ll create your own signature Cookie Monster Cookies that friends and family will request for birthdays, holidays, and every special occasion in between.
With buttery cookie dough, melty chocolate, crunchy cookie pieces, and colorful candies, these Cookie Monster Cookies are the perfect combination of fun and flavor. Bake a batch, pour yourself a cold glass of milk, and enjoy every gooey, chocolate-filled bite. Happy baking!