Personalized Introduction
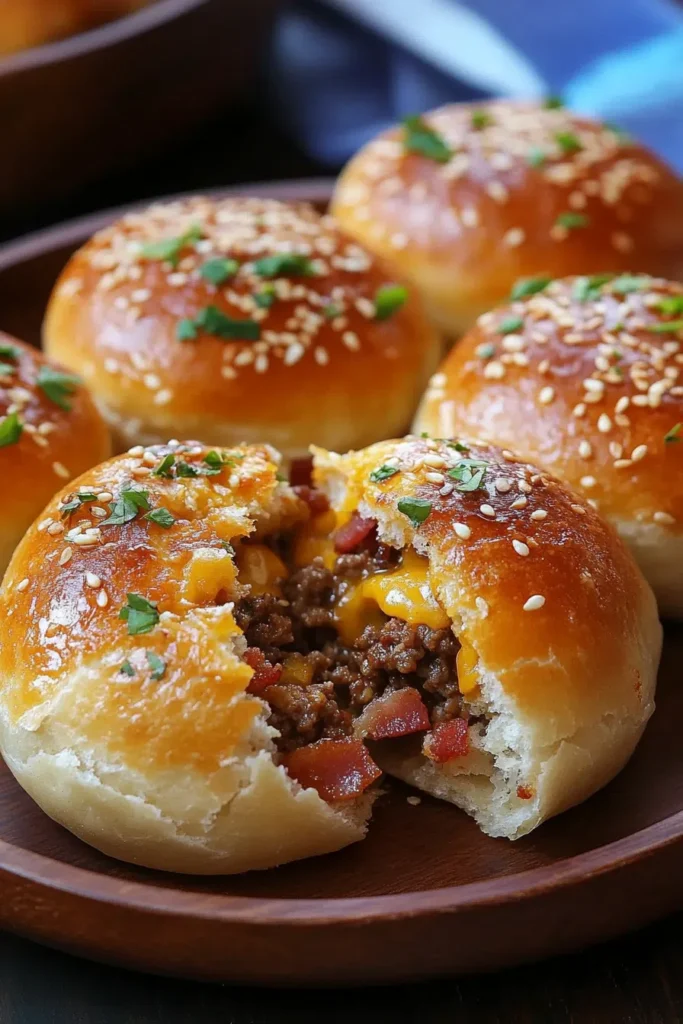
If you’re looking for the ultimate comfort food that’s packed with juicy beef, crispy bacon, gooey melted cheese, and wrapped in golden, buttery dough, these Bacon Cheeseburger Bombs are guaranteed to become a new favorite. They’re everything you love about a classic bacon cheeseburger, baked into bite-sized bundles that are perfect for dinner, parties, game day, or family gatherings.
The first time I made these cheeseburger bombs, they disappeared almost as quickly as they came out of the oven. The flaky golden crust, savory beef filling, smoky bacon, and stretchy melted cheese make every bite incredibly satisfying.
Serve them with your favorite dipping sauces, fries, or a fresh salad for a meal everyone will request again and again.
Let’s make these cheesy, bacon-loaded burger bombs that deliver big flavor in every bite.
Recipe Origin & Story
Cheeseburger bombs are a fun twist on the classic American cheeseburger, transforming all the favorite burger ingredients into portable, baked pockets of deliciousness. Wrapped in biscuit or pizza dough and baked until golden, they’re perfect for entertaining, meal prep, or quick family dinners.
Their handheld size and cheesy center have made them a popular comfort food that’s loved by both kids and adults.
In my kitchen, these bacon cheeseburger bombs are one of the easiest recipes to make whenever friends or family gather around the table.
Sometimes the best meals are the ones you can enjoy with your hands.
Ingredient Spotlight
- Main Star: Lean ground beef creates a juicy, flavorful filling that’s perfectly seasoned for a classic cheeseburger taste.
- Secret Boost: Crispy bacon and sharp cheddar cheese melt together to create an irresistible savory center.
- Quality Tips: Use freshly shredded cheddar, thick-cut bacon, quality ground beef, and refrigerated biscuit or pizza dough for the best results.
Nutritional Benefits
Ground beef provides protein, iron, and essential nutrients, while cheddar cheese contributes calcium and protein. Preparing these cheeseburger bombs at home allows you to control the ingredients and customize the fillings to suit your family’s tastes.
Pair them with a crisp salad or roasted vegetables for a balanced meal.
Adaptable Variations
- Dietary Swaps: Use ground turkey, chicken, or plant-based meat alternatives for a lighter option.
- Flavor Twists: Add diced pickles, sautéed onions, jalapeños, mushrooms, barbecue sauce, or pepper jack cheese.
- Seasonal Spins: Top with fresh tomatoes and lettuce in summer or serve with hearty soup during cooler months.
Cooking Science Explained
Cooking the beef before filling the dough removes excess moisture, preventing soggy cheeseburger bombs.
Brushing the dough with melted butter before baking helps create a beautifully golden, flaky crust.
Allowing the bombs to cool for a few minutes helps the melted cheese set slightly while remaining wonderfully gooey inside.
Easy, Step-by-Step Recipe
Ingredients
- 1 pound (450g) lean ground beef
- 8 slices bacon, cooked and crumbled
- 1½ cups shredded sharp cheddar cheese
- 1 small onion, finely diced
- 2 garlic cloves, minced
- 1 tablespoon ketchup
- 1 tablespoon yellow mustard
- 1 teaspoon Worcestershire sauce
- 1 teaspoon garlic powder
- ½ teaspoon onion powder
- Salt and black pepper to taste
- 1 can refrigerated biscuit dough or pizza dough
- 2 tablespoons melted butter
- 1 teaspoon sesame seeds (optional)
- Fresh parsley for garnish
Instructions
- Preheat the oven to 375°F (190°C).
- Line a baking sheet with parchment paper.
- Cook the ground beef and diced onion in a skillet until browned.
- Drain any excess grease.
- Stir in the garlic, ketchup, mustard, Worcestershire sauce, garlic powder, onion powder, salt, and pepper.
- Cook for 2 more minutes, then remove from the heat.
- Mix in the crumbled bacon and allow the filling to cool slightly.
- Flatten each biscuit or dough portion into a circle.
- Place a spoonful of the beef mixture in the center.
- Top with shredded cheddar cheese.
- Fold the dough around the filling and pinch the edges tightly to seal.
- Place seam-side down on the prepared baking sheet.
- Brush with melted butter and sprinkle with sesame seeds if desired.
- Bake for 18–22 minutes until golden brown.
- Garnish with fresh parsley and serve warm.
Practical & Valuable Tips
- Storage: Refrigerate leftovers in an airtight container for up to 4 days.
- Reheating: Warm in the oven or air fryer to keep the crust crispy.
- Serving Ideas: Pair with French fries, potato wedges, coleslaw, or a garden salad.
- Extra Flavor: Add diced pickles, crispy onions, or a slice of American cheese inside each bomb.
- Perfect Seal: Pinch the dough tightly to prevent cheese from leaking during baking.
- Restaurant Finish: Brush with garlic butter immediately after baking for extra flavor.
Make-Ahead & Batch-Cooking
Prepare the filling up to two days in advance and store it in the refrigerator. Assemble the cheeseburger bombs just before baking for the freshest results.
The assembled bombs can also be frozen before baking. Bake directly from frozen, adding 5–8 extra minutes to the cooking time.
These are excellent for meal prep, parties, and lunchboxes because they reheat beautifully.
Eco-Friendly Kitchen Hacks
- Store leftovers in reusable containers.
- Use leftover cooked beef for tacos or pasta.
- Freeze extra shredded cheese for future recipes.
- Compost herb stems whenever possible.
- Bake multiple trays at once to save energy.
Pairing Suggestions
- Beverages: Iced tea, lemonade, sparkling water, root beer, or creamy milkshakes pair perfectly with these cheesy bites.
- Dipping Sauces: Burger sauce, ranch dressing, barbecue sauce, ketchup, honey mustard, spicy mayo, chipotle aioli, or garlic sauce are delicious options.
Frequently Asked Questions
- Can I make these in the air fryer?
Yes! Air fry at 350°F (175°C) for 10–12 minutes until golden and cooked through.
- Can I freeze cheeseburger bombs?
Absolutely. Freeze before baking for up to 2 months and bake directly from frozen.
- What cheese works best?
Sharp cheddar is classic, but mozzarella, Monterey Jack, Pepper Jack, or Colby are all delicious.
- Can I use homemade dough?
Yes! Homemade pizza dough or dinner roll dough works wonderfully.
Call to Action
If you’re searching for a fun, cheesy meal that’s perfect for dinner, parties, or game day, these Bacon Cheeseburger Bombs belong on your menu. Crispy on the outside and loaded with juicy beef, bacon, and melted cheese inside, they’re guaranteed to be a hit.
If you make this recipe, leave a comment below with your favorite burger toppings or dipping sauces. Save this recipe for later and share it with fellow comfort food lovers!
Bonus: Your Kitchen Notes
One of my favorite things about these cheeseburger bombs is how easy they are to customize. Sometimes I add jalapeños for heat, barbecue sauce for sweetness, or crispy fried onions for extra crunch. Every version comes out perfectly golden with an irresistibly cheesy center.
Use this section in your WordPress editor to record your favorite cheeses, sauces, or burger-inspired fillings. Before long, you’ll have your own signature Bacon Cheeseburger Bombs recipe that’s perfect for parties, family dinners, holidays, and weekend snacks.
With flaky golden dough, juicy seasoned beef, smoky bacon, and gooey melted cheddar cheese, these Bacon Cheeseburger Bombs deliver all the flavors of your favorite burger in one delicious bite. Gather your ingredients, bake until golden, and enjoy every cheesy mouthful. Happy cooking!